Thursday 15 May 2014

Recover Deleted files, Undelete Files in Windows with Free Tools


Post By: Hanan Mannan
Contact Number: Pak (+92)-321-59-95-634
-------------------------------------------------------

Recover Deleted files, Undelete Files in Windows with Free Tools

Have you ever deleted a file that you did not wish to and wanted to recover it but did not find it in the recycle bin? You probably deleted it permanently with Shift+Delete or emptied the Recycle Bin. Now what? Don't worry, you may still have a chance to get it back. This article lists some free software that can recover deleted files from your hard drive or any other storage device instantly.

But how do the software mentioned below undelete deleted files?
recover deleted files
When files are deleted, Windows does not delete them from your hard disk. It marks the storage space as empty for new data to be written and deletes the index entry that tells the location of those files. Unless, new files are written on that space, the deleted files are still recoverable. That's what allows these software to recover deleted files. They just modify the data attached by Windows to deleted files to say these are 'regular' files.

There are many free software that allow users to do this. Some of them are given below:-

1) Pandora Recovery
recover deleted files in Windows
Pandora Recovery is a free software that offers a wizard based interface for recovering files. It allows you to browse a drive's individual folders to look for deleted files. It also allows you search for a deleted file based on its name, file size, creation date and last access time. Its deep scan allows you to recover files that other software might have missed. Although deep scan does not return a file's original name and location, it still is effective to recover data from drives with corrupted file tables and drives that were recently formatted. It can even recover data from CD's and DVD's.

2) TOKIWA DataRecovery
undelete files in Windows
At just over 200KB, TOKIWA DataRecovery is the smallest file recovery program in the market. It supports undeletion from FAT 12, FAT16, FAT32 and NTFS file systems. It also supports recovering NTFS compressed and EFS encrypted files. This software supports Windows and is portable as well. It also has a file shredder that allows you to wipe out files in a manner that they cannot be recovered again.

3) Recuva
undelete files
Another great freeware, Recuva offers a wizard based interface to unerase files. Recuva offers scanning deleted files based on their type (music, pictures, videos etc.). It also allows deep scanning in case a file you deleted is unrecoverable via normal search. Like TOKIWA DataRecovery, Recuva also offers securely deleting files. Recuva also has a portable versionthat you can keep in your flash drive.

All of these recovery software support recovery from memory sticks, digital camera cards and MP3 players. They support undeleting all types of pictures, software, movies and documents from both FAT and NTFS formatted drives . They work on Windows 8, Windows 7, Windows Vista and Windows XP.

Free File Recovery Software
Some important tips to increase the chances of getting your deleted files back:-

1) When a file is deleted accidentally on a storage device, make sure that you don't do anything on it as doing that would increase the chances of new data being written over your deleted files; which would make file recovery impossible.

2) If you have deleted files on your main computer (the one you are using right now), do not browse the internet, download new software or shut it down. Keep it running and go to another computer, download one of the software mentioned above that is portable and save it on a flash drive. Then plugin the flash drive in your current system and perform file recovery. Regardless of whether you accidentally delete files a lot or not, make sure to always have that software in your flash drive in case you accidentally delete important files.

3) If one software fails to recover your deleted file, it does not mean that another one wouldn't recover it too.
Read more

Recover Windows Password With Free Password Recovery Tools

Post By: Hanan Mannan
Contact Number: Pak (+92)-321-59-95-634
-------------------------------------------------------

Recover Windows Password With Free Password Recovery Tools

There are times when you forget your Windows password or someone changes it without your knowledge. In such situations, you will be locked out of Windows. To regain access, you can use some password recovery software to recover your Windows password. This article contains a list of some such password recovery software.

Recover Windows Passwords Free
Note:  Most of these software are available as Live CD's. (For non technical readers, a Live CD is a compact disk that contains a bootable operating system that you can use from the CD itself, without having the need to install it.)

Ophcrack
Ophcrack offers one of the best free password recovery solutions in the market. Ophcrack comes in two versions: a stand alone installer and a Live CD. The stand alone installer requires you to additionally download separate rainbow tables whereas the Live CD already has them. As the stand alone installer uses about 1.5GB of rainbow tables, it offers much better recovery. However, the download size is certainly an issue. Also, the Live CD version is a bit easier to use for cracking passwords.

recover Windows passwords

So, I will discuss only the Live CD version. You must choose the right version of Ophcrack Live CD for your operating system. If you use Windows XP, the download (Ophcrack XP Live CD) is nearly 415MB whereas for Windows 7, Windows Vista and Windows 2008, it (Ophcrack Vista Live CD) is about 495MB. Ophcrack may be identified as a virus by your anti-virus software. That is a false alert and should be reported to the antivirus company.

To crack passwords with Ophcrack, download the iso file for the appropriate Live CD and burn it on a compact disk using an image burning software. If you use Windows 7, you can use your OS's inbuilt image burning software.

Then boot the computer whose password you wish to recover using that disk. Ophcrack is fully automatic and you don't need to do anything from your side. It will automatically detect users and start the password recovery process. Then, it will display their passwords on the screen. You can note them for logging in to the locked account.

Ophcrack recovers passwords nearly 99 times out of 100. Ophcrack is limited to recovering passwords upto 14 characters.

PC Login Now
If you mind downloading large amounts of data Ophcrack needs, then PC Login Now is an excellent alternative. In addition to its smaller size, its password recovery is one of the fastest and the easiest I have seen. However, PC Login Now does not actually recovers your password. It resets it.

File Recovery Windows free

To get started, you will need to download a nearly 60MB exe file from the PC Login Now website. Open the downloaded file to extract the ISO image of the Live CD. Burn the ISO file to a compact disk and then, boot your computer using the burned disk. PC Login Now will automatically load. Follow the on-screen instructions to choose your operating system and then the username whose password you wish to reset.

Then, choose the Password is empty checkbox to remove your password. Then, PC Login Now will ask you to reset another user's password. Choose No and then OK to restart your PC. Use a blank password while logging in and you are good to go. PC Login Now works on Windows 7, Windows XP and Windows Vista.

Offline NT Password Recovery & Registry Editor
Another open source recovery software that resets forgotten Windows passwords. Offline NT Password Recovery is also needed to be installed on a CD before working. However, there is also a version that can be installed on USB drives to create a bootable usb drive (if your motherboard supports it). Its small size (nearly 3MB) makes it an excellent alternative to other bulky recovery options.

Password Recovery Windows

It just has one con. Its interface being completely text based is not for the lovers of GUI based systems. To reset your password, just boot into your computer using the Live CD or the USB drive and follow the on-screen instructions. Your password will be changed to a blank one. This software works on Windows 7, Windows XP, Windows NT and Windows Vista. It also supports 64 bit versions of these Operating systems.

Cain & Abel
Cain & Abel is another free password recovery software. Unlike the software mentioned above, Cain & Abel needs to be installed on another administrator account on the computer containing the locked account. It also requires separate downloading of rainbow tables. Since, you can use inbuilt Windows functions to reset a password if you have access to a working admin account on the computer, I see no use for this software unless you are desperate about recovering your password. Cain & Abel works only on Windows XP.
Read more

Change Processor Name Permanently


Post By: Hanan Mannan
Contact Number: Pak (+92)-321-59-95-634
-------------------------------------------------------

Change Processor Name Permanently

A while ago on Tweak And Trick, I published an article on changing your processor name. But recently, Anil Kumar pointed out that the trick only changed the name temporarily.

After a user restarts his computer, the name reverted back to original which is obvious as each time Windows boots, it checks the connected hardware and updates the registry value automatically. So,changing the processor name using the earlier article did not had permanent effect on the processor name.

Thus, the alien processor name you had earlier again reverted back to the boring old one.

Change Processor Name Permanently

Problem: To, make the name change permanent, it was required that the user updates the Processor Name String registry key each time when Windows starts.

Solution: It is very easy to change your processor name permanently by creating a registry key and placing a shortcut to it in the windows start up folder. To do so, just follow the steps given below:-


Steps :-
1.  Open Notepad.
2.  Copy and paste the exact code given below:-

Windows Registry Editor Version 5.00

[HKEY_LOCAL_MACHINE\HARDWARE\DESCRIPTION\System\CentralProcessor\0]
"ProcessorNameString"="My Processor name 50000MHz"
To change the processor name, edit the part of the code given in blue. Also understand that \0 in the above code should only be present if Windows store your processor name at that location. Please open Registry Editor and navigate to the above mentioned keys to check whether or not to include the \0.

3.  Click on File Menu, click on Save As and select "All Types" in Save as Type option. Save the file as ProcessorNameChange.reg or *.reg.
4.  Create a new shortcut on your desktop. Enter regedit / S "Location of the .reg file" as the location of the item. For example, enter regedit /S "C:\Processor Name.reg" if your registry file is located in the root of C:\ drive.

Processor Name

5.   Copy the created Shortcut file.
6.  Navigate to C:\Documents and Settings\All Users\Start Menu\Programs\Startup (in Windows XP) or toC:\Users\ User-Name\AppData\Roaming\Microsoft\Windows\Start Menu\Programs\Startup (in Windows 8, Windows 7 and Windows Vista. Also remember that AppData is a hidden folder.)  if C: is your System drive.
7.  Paste the copied file.


This registry file would now execute each time when Windows starts and the Processor Name String would be modified each time. So, even upon restarting your computer, you will see that the changed processor name is permanent.
Read more

Use Keyboard as Mouse [How To]


Post By: Hanan Mannan
Contact Number: Pak (+92)-321-59-95-634
-------------------------------------------------------

Use Keyboard as Mouse [How To]

If your mouse is not working and you don't wish to wait till you get a new mouse, you would definitely like to know how you can use your keyboard as your mouse. It is easy to use your mouse as keyboard in Windows using the On Screen Keyboard utility, but it is also possible to do the reverse.

Keyboard Mouse

All you need to do is:

Windows XP Users:-
  1. Go to Control Panel.
  2. Then click on Switch to Classic View.
  3. Then Click on Accessibility Options.
  4. Then Click on the Mouse Tab.
  5. Select Use MouseKeys.
  6. Click on OK.
  7. Then activate NumberLock (by pressing the NumLk key).
  8. You should hear a beep sound.
  9. Now you can control the mouse pointer using the arrow keys on the numeric keypad.
use keyboard as mouse


Windows 8Windows 7 and Vista Users:

  1. Open Ease of Access Center by clicking the Start button , clicking Control Panel, clicking Ease of Access, and then clicking Ease of Access Center. 
  2. Click Make the mouse easier to use.
  3. Under Control the mouse with the keyboard, select the Turn on Mouse Keys check box.

You can also increase the acceleration and speed of your mouse movements according to your needs.

You can alternately press the Alt+Shift+Num Lock combination to instantly activate the mouse keys.


Laptop Keyboard Mouse

For laptops, this will only work if your laptop keyboard has a numeric keypad or alternative keys which you can enable by pressing the Number Lock Key or the Function key.

On my laptop, number 6 key of the numeric keypad moves the mouse pointer left, number 4 key moves the mouse pointer right, number 2 key moves it down, number 8 key moves the mouse pointer up, number 5 and + key serve as right click while the number 0 key works as left click.
Read more

Have a Personalized Logon Wallpaper in Windows XP


Post By: Hanan Mannan
Contact Number: Pak (+92)-321-59-95-634
-------------------------------------------------------

Have a Personalized Logon Wallpaper in Windows XP

Have you always wanted to have your image displayed as a log on banner whenever you start your PC? This article explains the exact procedure required to have your own photo or your pet's photo displayed as one such banner. With this trick, you can have a personalized wallpaper which would appear before your log in screen each time you start your computer.

To use this trick, you need to have a bmp file. If your image is of any other format, you can save it in bmp format using MS Paint or Irfan View(To download Irfan View, visit 5 Essential Freewares for your PC).

Now that you have the bmp file, follow the steps given below.

  1. Click on Start.
  2. Click on Run.
  3. Type "regedit" in the dialog box without quotes.
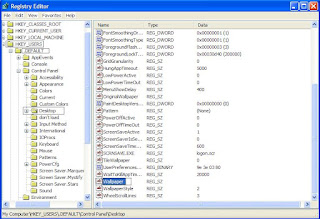
  4. Navigate to HKEY_USERS\.DEFAULT\Control Panel\Desktop.
  5. In the right hand pane, double click on the value Wallpaper.
  6. In the Value Data option, enter the full path to your bmp file you want to be your wallpaper. Example: For a file named image.bmp placed in Windows folder, type "C:\WINDOWS\image.bmp" without the quotes.
  7. Double click on Wallpaper Style, and change its value to 2 to get a stretched image.
A personalized Logon Wallpaper Registry Editor
    Close the Registry Editor and Restart the PC to apply the changes.

    Once the changes are applied, each time you start your PC , you will see the log on wallpaper. To undo the trick, simply delete the address to your image in Step 5.

    P.S: I have my photo as the log on wallpaper.  What is yours?
    Read more

    Notepad Tricks: Cool Notepad tricks for Windows


    Post By: Hanan Mannan
    Contact Number: Pak (+92)-321-59-95-634
    -------------------------------------------------------

    Notepad Tricks: Cool Notepad tricks for Windows

    Notepad, the text editor that comes bundled in Windows is an excellent tool for text editing. But that is not the only thing for which notepad is famous. It is also famous for its tricks and hacks. Here is a roundup of some of the best and coolest tricks that you can try using Notepad.

    Matrix Falling Code Effect - Notepad CMD (.BAT) Tricks

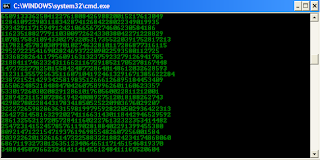
    Inspired by the movie Matrix, this falling code trick is extremely popular on social networking websites. Copy and paste the code given below in Notepad and save the file as "Matrix.bat" or *.bat.

    @echo off
    color 02
    :tricks
    echo %random%%random%%random%%random%%random%%random%%random%%random%
    goto tricks

    Notepad tricks
    Matrix Falling Code Effect - Notepad Trick

    Upon running the bat file, you will see the "Matrix falling code" effect.

    Make Your Keyboard Type (Any) Message Continuously-VBS Trick

    This VBS trick can make any of your friend's keyboard type any message continuously. Open Notepad, copy the code given below and save the file as Tricks.vbs or *.vbs. You will need to restart your computer to stop this. Try this after closing all important programs.

    Set wshShell = wscript.CreateObject("WScript.Shell")
    do
    wscript.sleep 100
    wshshell.sendkeys "This is a Virus. You have been infected."
    loop
    Send this file to your friends as an email attachment to see the fun.


    Notepad Virus

    Create a Harmless Funny Virus with Notepad-Continuously eject CD/DVD drives

    This VBS trick will create a code which will continuously eject all your connected Optical drives. If you put them back in, it will pop them out again. Copy this code and paste it in Notepad as Virus.vbs or *.vbs.

    Set oWMP = CreateObject("WMPlayer.OCX.7")
    Set colCDROMs = oWMP.cdromCollection
    do
    if colCDROMs.Count >= 1 then
    For i = 0 to colCDROMs.Count - 1
    colCDROMs.Item(i).Eject
    Next
    For i = 0 to colCDROMs.Count - 1
    colCDROMs.Item(i).Eject
    Next
    End If
    wscript.sleep 5000
    loop

    Double click to open this file and you will be impressed by this awesome trick.

    Make a Personal Diary(Log) with Notepad (Easter Eggs)

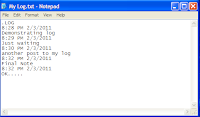
    Notepad Diary
    Notepad Diary
    You can use this trick to create a personal log with Notepad which will automatically include the current date and time before your note. To do so, open Notepad and type .LOG in capital letters and press Enter. Save the file. Now, every time you open this file, notepad will automatically insert the current time and date before the note. Just enter your note and save the file each time after making an entry.

    All these Notepad tricks are totally harmless and would not harm your PC in any way.  To close any of the VBS trick given, open task manager and close the wscript.exe process. These tricks work on Windows 8, Windows 7, Windows Vista and Windows XP.
    Read more

    How to Fix a Slow Windows 7 Computer??


    Post By: Hanan Mannan
    Contact Number: Pak (+92)-321-59-95-634
    -------------------------------------------------------

    How to Fix a Slow Windows 7 Computer

    Most people love using Windows 7. That’s because it’s by far the nicest and the most productive Microsoft operating system to date. But there can still be glitches, errors, and lags. The good thing about Windows 7 is that it has lots of tools to troubleshoot and repair a slow computer. Here is a guide to where to find them and how to use them.

    1. Problem Steps Recorder

    fix slow computer windows 7
    Problem Steps Recorder is a great solution to get a detailed description of the problem, so that you can either review the report yourself or send it to a tech support team. Basically, this tool records everything happening on the computer that needs troubleshooting. It records all mouse clicks and everything that is pressed on the keyboard, takes screenshots, and then saves the report as a zipped MHTML file. This file can be easily emailed and analyzed. To enable Problem Steps Recorder, click on Start, type PSR and hit Enter. Then click on Start Record. To save a report, just stop recording your computer activity.

    2. Troubleshoot problems

    If something in Windows 7 starts behaving in a weird way and you have no idea why, go to the Control Panel, locate the “Find and fix problems” (Troubleshooting) option and you’ll be able to access the Windows 7 troubleshooting tools. They are easy-to-use wizards and can fix common problems, clean your system, check your settings, and lots more.

    3. Discover bottlenecks

    Under normal circumstances, Windows 7 easily outperforms Vista and XP. Nevertheless, your computer can still seem too slow from time to time. Most likely it’s an application or a process that’s slowing you down. Windows 7 makes it really easy to find bottlenecks with the help of Resource Monitor. Just click on Start, type RESMON and hit Enter to launch the tool. When it opens, click on the CPU, Memory, Disk and Network tabs to see which processes are hogging your system and using up your bandwidth. When you find the process that’s holding you back, you’ll be able to try to fix it right from the Resource Monitor. For example, if a process is locked up, right-click on it and select Analyze to see where the problem lies.

    4. Repair your computer

    If something goes seriously wrong and Windows 7 fails to start, it might be possible to repair your computer without the installation CD. Just boot your PC and press F8 during startup. You should see an option called Repair Your Computer. Select it and press Enter to see the recovery options Windows 7 has to offer.
    These Windows 7 tools will help you troubleshoot and fix a slow computer in a quick and easy way. To prevent your computer from slowing down, use maintenance utilities like disk cleanup and defrag to keep your PC in top shape.
    Read more

    Windows 7 Tips, Tricks and Shortcuts to Increase Productivity


    Post By: Hanan Mannan
    Contact Number: Pak (+92)-321-59-95-634
    -------------------------------------------------------

    Windows 7 Tips, Tricks and Shortcuts to Increase Productivity

    Windows 7 is not a new operating system, but it is new to many users. Windows 7 has several interesting new features that make this OS better than previous Windows versions. These tips for Windows 7 may not make you an expert, but they should make your experience with Windows 7 much more fun and productive.

    Shake it up 

    Windows Aero Shake in 7
    Windows 7's "shake" feature allows you to minimize all the windows on your desktop in only one step, leaving only the window you are working in. This is great if you often run multiple programs at once.
    To use this feature, click and hold the title bar of the window you want to keep maximized. At the same time, use your mouse to shake it back and forth quickly. All the other windows will then minimize to the taskbar. If you want to get those windows back, just click on the tile bar and shake it again.

    You don’t have to "shake" to do this. If you want to make this feature less fun, you can press the Windows Key and Home Key simultaneously.
     
    Customize your taskbar

    You can rearrange your taskbar buttons quite easily. You just drag an icon to where you want it to be. You can drag in icons from applications, the start menu, the desktop and pretty much anywhere else you can find them and “pin” them to the taskbar. If you get sick of an icon you can right click on them and “unpin” them.

    Windows 7 taskbar tips

    Use XP mode

    There are lots of folks with old, yet important, software that isn’t compatible with this newer operating system. Thankfully, Windows 7 comes with “XP Mode,” which is essentially a virtual copy of this old OS that you can run on your desktop. This won’t work for all Windows 7 users however; only those with hardware virtualization built-in to their systems (and turned on) can use this feature.

    Windows 7 XP Mode Tips

    Shortcuts!!!!
    This is probably one of the most exciting new features for power users. If you are not a power user, you could turn into one soon with shortcuts. These are just some of the new shortcuts that can make your experience better and more productive with Windows 7:

    - In Windows Explorer, you can bring up a preview pane on the right side of a window with ALT + P
    - You can automatically open a new Explorer menu to show your libraries folder with Windows + E
    - You can cycle through all open programs with the Taskbar’s peek menu by using Windows + T
    - The Magnifier lets you zoom in or out on your entire desktop or even just a part of your screen. This feature only works when Aero desktop is enabled. You can activate the Magnifier by pressing Windows + (plus key) or Windows + (minus key)
    - If a window is not maximized, you can fill your screen with it by pressing Windows + UP
    - You can minimize an active window by pressing Windows + Down

    Windows 7 shortcuts

    Conclusion
    These are just some tips for Windows 7. There are plenty more new features and shortcuts to explore. Hopefully these tips will make you more productive and let you have more fun with Microsoft’s most current operating system.
    Read more

    Make your Computer Welcome You


    Post By: Hanan Mannan
    Contact Number: Pak (+92)-321-59-95-634
    -------------------------------------------------------

    Make your Computer Welcome You

    Do you watch movies? Have you always loved the way how Computers in movies welcome their users by calling out their names? I bet that you too would want to know how you can achieve similar results on your PC and have a computer said welcome.

    Then you are at the right place, this article describes exactly how you can make your computer welcome you like this.

    With this trick, you can make your Computer welcome you in its computerized voice. You can make your Windows based computer say "Welcome to your PC, Username."

    Make Windows Greet you with a Custom Voice Message at Startup

    To use this trick, follow the instructions given below:-

    1. Click on Start. Navigate to All Programs, Accessories and Notepad.
    2. Copy and paste the exact code given below.
    Dim speaks, speech
    speaks="Welcome to your PC, Username"
    Set speech=CreateObject("sapi.spvoice")
    speech.Speak speaks
         3.  Replace Username with your own name.
         4.  Click on File Menu, Save As, select All Types in Save as Type option, and save the file as Welcome.vbs or "*.vbs".
         5.  Copy the saved file.
         6.  Navigate to C:\Documents and Settings\All Users\Start Menu\Programs\Startup (in Windows XP) and to C:\Users\ {User-Name}\AppData\Roaming\Microsoft\Windows\Start Menu\Programs\Startup (in Windows 8, Windows 7 and Windows Vista) if C: is your System drive. AppData is a hidden folder. So, you will need to select showing hidden folders in Folder options to locate it.
         7.  Paste the file.


     Make your Computer Welcome you at startup

    Now when the next time you start your computer, Windows will welcome you in its own computerized voice.

    Note: For best results, it is recommended to change sound scheme to No Sounds.
    You can change the sound scheme to No Sounds by following the steps given below:-
    1. Go to Control Panel.
    2. Then click on Switch to Classic View.
    3. Then Click on Sounds and Audio Devices.
    4. Then Click on the Sounds Tab.
    5. Select No Sounds from the Sound Scheme option.
    6. If you wish to save your Previous Sound Scheme, you can save it by clicking Yes in the popup menu.
    7. Click on OK.
    Change Sound Scheme to No Sounds

    Try it yourself to see how it works. In my personal opinion, this is an excellent trick. Whenever I start my PC in front of anybody and the PC welcomes me, the fellow is left wondering how brilliant a computer do I have.
    Read more

    Command Prompt Tricks, Hacks & Codes

    Post By: Hanan Mannan
    Contact Number: Pak (+92)-321-59-95-634
    -------------------------------------------------------

    Command Prompt Tricks, Hacks & Codes

    Command Prompt is one of the most powerful tools in Windows; but sadly, it is also the most ignored one. Things were not always like this; but with the advent of GUI based operating systems, people started feeling that computing through command based tools was boring. This ultimately lead the command prompt into obscurity.

    However, the command prompt is not useless. In fact, it can be pretty useful. This article provides some excellent tricks, secrets and hacks that will make you realize that the Windows Command Prompt is not only useful but also a tool that you should definitely give more respect to.

    Ascii star wars command prompt
    1-Watch ASCII version of the Star Wars Episode IV movie
    Surprised yet? You can watch an ASCII version of the full Star Wars Episode IV Movie right in your command prompt window. Just open command prompt, type a small code and the movie will start playing immediately. Read the complete instructions here.

    2- Create Matrix falling code effect
    Have you watched “The Matrix”? Of course, you have. Then, you already know what I am talking about. In case you still don't know what I mean, take a look at this image! You can create the same effect in command prompt using just a few lines of code. Head over to this post for instructions.

    command prompt tricks

    3- Make Folders that you cannot delete
    Are you tired of accidentally deleting important folders? Well, if you are, you can learn how to makeundeletable folders here.

    4- Shutdown your computer giving a funny reason
    What if your computer shuts down saying that it is tired and doesn't want to work anymore? It would be fun, wouldn't it? You can do so by reading the instructions here.

    5- Know your IP address, DNS Server's address and a lot more about your Internet Connection
    Command Prompt can even let you know your IP address. Just type ipconfig/ all in the command prompt and press Enter. Along with your IP address and DNS servers, command prompt will also return a ton of information like your host name, primary DNS suffix, node type, whether IP Routing ,Wins Proxy, and DHCP are enabled, your network adapter's description, your physical (MAC) address etc .

    6- Know if your neighbours are stealing your Wifi connection
    command prompt codes
    Command Prompt can let you know if someone is connected to your Local Area Connection and using it. Just follow the steps:-
    1) Open your browser and visit http://192.168.1.1 or http://192.168.0.1 depending on your router.
    2) Find the tab that mentions “Attached Devices” or something similar.
    3) Find the computer name, IP address and MAC Address (sometimes called Physical Address or Hardware Address) of your computer using the previous trick.
    4 )Compare it with those displayed by your router in Step 2. If you notice some strange devices, then your neighbour has been sneaking in on your internet connection and it is best to ensure that yourwireless network is as secure as it can be.

    7- Know if someone is hacking your computer/ Trace a Hacker
    Command Prompt hacks
    Want to know if someone is hacking your computer? Command Prompt can help you find if someone you don't know is connected to your computer stealing private data. Just execute netstat -a and the command prompt will return a list of computers that your computer is connected to. In the results returned, Proto column gives the type of data transmission taking place (TCP or UDP) , Local address column gives the port with which your computer is connected to an external computer and the Foreign Address column gives the external computer you are connected to along with the port being used for the connection. State gives the state of the connection (whether a connection is actually established, or waiting for transmission or is “Timed Out”).

    These tricks work on Windows 8, Windows 7, Windows Vista, Windows XP and all previous versions of Windows.

    Now you know just how useful command prompt can be. Find more awesome tips and tricks in the Tricks section.

    Read more

    Convert FAT32 to NTFS Without Formatting or Losing Data

    Post By: Hanan Mannan
    Contact Number: Pak (+92)-321-59-95-634
    -------------------------------------------------------

    Convert FAT32 to NTFS Without Formatting or Losing Data

    You have a flash drive or probably an external hard drive that currently has FAT32 file system and you want to change it to NTFS, because FAT32 does not support handling large files (over 4GB) or it is just simply old for your taste but there is just one problem, you don't want to lose your saved data. This article is for you then as it explains exactly how you can achieve seamless transition from FAT to NTFS without involving any data loss.

    FAT32 to NTFS

    While it is generally recommended to use the NTFS file system because of its stability, security and lesser defragmentation time, most of us end up using FAT32 because that is what most disks are preformatted with. Unless, we notice the “Not enough disk space error” despite disk space being available, we don't bother to change the file system. Moreover, most of us don't change it because of the risk of losing important data and lack of time (read laziness). As Microsoft was aware of this scenario, they added a capability in the command prompt to overcome this by executing a simple command. There are manysoftware that support this too but the Convert command is one of the easiest ways to do so. Follow the steps below to know how:-

    Important: While this method works perfectly, I would still advise you to backup your data in case anything goes wrong.

    FAT 32 to NTFS Conversion Steps

    1) Go to Computer, and note the name of the drive whose file system you wish to convert.
    2) Click on Start.
    3) Type cmd in the search bar if you use Windows 7, Windows 8 or Windows Vista. If you use Windows XP, click on Run and then execute cmd.
    4) Execute "chkdsk h: /f " (without quotes) where H is the letter of the drive to undergo conversion. This checks the drive for errors and fixes them automatically.
    5) Execute "Convert H: /FS:NTFS" (without quotes). H is again the letter of the drive to be converted.
    6) The command prompt will start the conversion process and after a few minutes, CMD will say that conversion was successful.
    7) You can check it in the properties of the drive through right click<Properties.

    Convert FAT to NTFS

    This works on Windows 7, Windows XP, Windows 8 and Windows Vista. I converted my flash drive's file system using these steps and it worked flawlessly. It is interesting to note that this method cannot be used to reconvert NTFS file system back to FAT32. To reconvert back to FAT32, you will need to format the entire drive which will definitely cause data loss.
    Read more

    Notebook Accessories to Look Out For


    Post By: Hanan Mannan
    Contact Number: Pak (+92)-321-59-95-634
    -------------------------------------------------------

    Notebook Accessories to Look Out For

    The demand for notebooks has increased tremendously over the past few years. More and more consumers are choosing notebooks over traditional desktop computers. Netbook manufacturers are constantly adding new features to their products, thus making them even more attractive to users. Manufacturers are also frequently lowering prices in an attempt to create new customer segments for their products. Due to the dropping prices, more and more consumers are able to get access to notebooks. The other reason why notebooks are preferred by businessmen, students and working professionals is that they are portable.

    Notebook Accessories
    A common Notebook Cooling Pad
    Due to the increasing use of notebooks in recent years, many computer manufacturers are now offering a wide variety of accessories and add-ons which are aimed at making the device more effective and thus enhancing the user experience. The following are some of the most important netbook accessories you need to look out for.

    1. Surge protector
    Netbooks, just like laptops and desktops, run on power. Very often, you will need to charge the device by plugging the power adapter into the wall outlet. The problem is that a sudden power surge can cause serious damage to a notebook. This is why a surge protector is very important. You can place it between the power adapter and the wall outlet so as to ensure safety. Surge protectors are very light and can therefore be carried around easily from one place to another.

    2. Cooling stand
    When used for a long period, netbooks can get very hot. When using a netbook on your lap or on a solid surface, it is therefore advisable to use a cooling stand between the surface and your notebook. The cooling stand has an in-built fan which keeps the notebook cool. When temperatures are kept low, the notebook can also save power. Therefore, if you intend to work on your netbook for long durations, a cooling stand is a very vital accessory for you.

    3. Netbook stand
    Contrary to popular belief, notebooks were not designed to be necessarily used on the lap. There are times when you might desire to use the netbook as a desktop PC. Some computer manufactures offer stands which can help you place your netbook on a desk, as well as use it with an external keyboard. Once you have finished working, you can easily disconnect the keyboard.

    4. Bluetooth GPS
    A Bluetooth GPS (Global Positioning System) is an important accessory for people who need to use the GPS feature to keep tabs on specific things. Besides the Bluetooth GPS, you might also want to install Google Map and an internet wireless modem into your netbook.

    5. Portable speakers
    The sound quality of notebooks is usually not sufficient for anyone who wants to watch a movie or listen to music. To experience good sound quality, you might want to add a couple of small speakers to your notebook. Such speakers are usually very light and can therefore be carried around easily.

    6. Port replicator
    Handling all the connections and wires of the netbook can be very frustrating. The port replicator or docking station makes it very easy to connect all the peripherals needed for operating the netbook.

    7. Battery backup
    When purchasing your netbook, make sure an extra battery or two. An extra battery would come in very handy especially when you are traveling for a long period. This way, you wouldn’t have to worry about short battery life.

    8. Carrying case or backpack
    A carrying case or backpack is a very important accessory for people who carry their netbooks around very frequently. These cases or backpacks come in a wide variety of designs and styles.
    Read more

    How to Deal with Unwanted Phone Calls

    Post By: Hanan Mannan
    Contact Number: Pak (+92)-321-59-95-634
    -------------------------------------------------------

    How to Deal with Unwanted Phone Calls

    Did you know that the most unused feature on a smartphone is the phone itself? We just don’t call each other the way we used to. Instead we text, email, or Facebook to get in touch. This is the reason your phone doesn’t ring very often. When it does, you usually know who is calling you thanks to caller ID. Caller ID allows you to screen every phone call and only answer when you want to talk. If you don’t, you can ignore the call and return it when it’s more convenient to you. But what if just ignoring the call isn’t an option? Or what if you don’t know who is calling and you answer the phone only to find out that it’s someone you really don’t want to talk to? Here are some tips on how you can deal with unwanted phone calls.

    unwanted phone calls
    Photo Credits: Hanan Mannan

    The Super Chatty Relative

    We all know what it’s like to have a telephone conversation with someone who just won’t shut up. We make polite comments of agreement like, “Mmhmm,” and “I see,” but we aren’t really listening that closely. We’re just thinking about how we can put an end to the conversation politely. Lots of times this super chatty relative is an overbearing mother, and you just don’t want to disrespect her or hurt her feelings.

    When you get a phone call from Mom, answer but be prepared to start ending the conversation before it even starts. Say something like, “Hi Mom. I wanted to answer so you know I’m okay, but I really don’t have time to talk right now. Can I call you back?” If you give her a chance to start the conversation, you’ll have no other chance to end it.

    The Telemarketer

    Those telemarketers really are sneaky. You see an unknown number, and out of curiosity you answer the phone. When they immediately start their sales pitch, you regret not just letting it go to voicemail. In these situations, lots of people are tempted to start cursing or yelling, but that’s the worst way to handle things. The telemarketer is only doing his job, so avoid bad karma and don’t be mean. Politely say, “I’m not interested,” and immediately hang up. That’s that. And to avoid getting more of these calls in the future, register your telephone number with your nation's Do Not Call Registry.

    The Stalker

    In extreme situations, your unwanted calls may actually be calls of harassment. Whether it be a jilted lover, a vindictive friend, or a total stranger, harassing phone calls should be taken seriously. Try to avoid answering the calls, and do not respond to harassment. Call your phone company and notify them, and they may be able to prevent the number from calling you. If the harassment doesn’t stop or is taking the form of threats, keep a log of all harassing calls, and notify law enforcement to file a report. The police should step in and take action to stop the stalker. You may also need to change your phone number.
    Read more

    Staying Safe On Your iPhone

    Post By: Hanan Mannan
    Contact Number: Pak (+92)-321-59-95-634
    -------------------------------------------------------
    Staying Safe On Your iPhone
    By now, it is certainly safe to say that Apple has gained a wider following than just the young, tech-savvy demographic that initially seemed to flock to Mac products. While Mac computers (and specifically the MacBook Pro) have steadily arisen in popularity, the brand’s move to household name is built largely on their fleet of iOS products, and specifically the iPhone. Apple boasts intuitive-yet-sophisticated software as at least one reason that users from a broad range of demographics are drawn to their products.

    Stay Safe of iPhone

    Most users will find the transition into using an iPhone fairly smooth and will have very few problems with the basic usability of their phone even without much research or practice. While this is definitely a good thing, many users tend to settle into a rut, using only the basic functions of the device and failing to capitalize on additional features. In many cases, this simply means less entertainment so it might not be a big concern. In others, however, it might mean less security and that should definitely be a concern. The iPhone has several security features enabled by default but users (particularly those new to iOS products) should at least be aware of a few additional safety features.

    1. Auto-lock and Passcode

    The iPhone is set by default to Auto-Lock after 1 minute without use but this setting can be disabled (Settings > General > Auto-Lock) or set to auto-lock after 2, 3, 4 or 5 minutes. When combined with the Passcode Lock setting, Auto-lock is a simple, yet effective, safety feature. When Passcode Lock is activated (Settings > General > Passcode Lock), it requires that a 4-digit code be entered before the phone is unlocked. Enabling both of these settings will prevent unauthorized activity on your phone (be it your 2 year old son or a stranger that has found your lost phone).

    2. Wi-Fi Settings

    One of the big advantages of an iPhone (or any Smartphone) is Wi-Fi support. This advantage can also be a potential risk because it opens up the possibility that hackers access your phone data via the web. One simple precaution can be taken by enabling the Ask to Join Networks feature (Settings > Wi-Fi > Ask to Join Networks). When this feature is enabled, an alert will pop up before automatically joining any new or unknown Wi-Fi network. This feature gives you the ability to only join networks you trust.

    3. Device Usage Restrictions

    The iPhone now allows users to enable specific usage restrictions (Settings > General > Restrictions). This setting allows you to block the use of certain features such as Safari, YouTube, or the Camera. It also allows you to block music and video content based on various rating systems. Many users with children take advantage of these settings but it is also a good way to avoid viewing or hearing explicit content unintentionally.

    Read more

    6 Uncommon But Highly Useful iPhone Features

    Post By: Hanan Mannan
    Contact Number: Pak (+92)-321-59-95-634
    -------------------------------------------------------

    6 Uncommon But Highly Useful iPhone Features

    An iPhone is a brilliant device and anyone who has one knows that it can make almost everything you do easier; whether that be looking for a nearby bar or sending e-mails to clients and colleagues. However, while you're probably familiar with many of the very useful aspects of your phone, there is a good chance that there are still things that you haven't made full use of yet. There are probably elements of your phone that you aren't using to the fullest. Here we will look at a few things to do with your iPhone that you perhaps weren't aware that you could do.

    Use a Keyboard

    iPhone Keyboard

     iPhones are undoubtedly useful productivity tools, but unfortunately, they are limited by having a small touch screen as the only input option. A great way to get more out of your iPhone, is to use a Bluetooth keyboard to control it. Using a Bluetooth keyboard, you can type as quickly as you could on a PC and even control your phone remotely.

    Share Files

    iPhone Share Files

    iPhones come with a built in cloud service called iCloud.  iCloud allows you to drag and drop files into a shared folder which all of your devices can access. This way, you can edit a file and then share it with your main computer within instances and with no need to use any wires. Drop Box offers a similar option.

    Tethering

    iPhone Tethering

    Only recently have iPhones caught up to Android in this respect, and it's a good thing they did as this is one of THE most useful functions of modern smartphones. Basically by enabling wireless tethering, you can provide a Wi-Fi internet connection that a computer or even another phone can connect to; meaning that you always have access to the web wherever you go.

    Jailbreaking

    iPhone Jailbreak

    If you haven't considered jailbreaking your iPhone yet, then perhaps it's time to. This way you will be able to run a vast number of apps that you currently won't be able to and that will allow you to get a LOT more out of your phone. This includes the use of emulators, the ability to customize the appearance and even the option to use a different keyboard or a different web browser. It's not illegal and it's easily reversible. The only thing against it is that it voids your warranty. So, use it only if your phone is out of its warranty period.

    HDMI Cable

    Connect iPhone to TV

    There are HDMI cables available for iPhone that allow you to connect your smartphone to a HD TV; meaning that you can watch YouTube or play apps on the big screen. Combine this with a wireless keyboard or controller and you practically have a mini game console that you can carry anywhere with you.

    Computer Control

    Control your computer with iPhone

    Apps like TeamViewer allow you to control your computer wherever you go; meaning that you can open and edit documents, stream movies and more. This is amazing for watching films while reclining on the sofa, or for quickly accessing your files when you're traveling.
    Read more